Showing posts with label Pintering. Show all posts

DIY Dining Room Table


When we picked up and moved across the country for dental school, we left our awful little college apartment dining set behind. It. was. bad. It was one of those small, square ones where if you had four people sitting there you were all awkwardly playing footsy with each other. So when we moved to our new place in Florida, we decided we needed to upgrade. However, anyone who knows me well knows that I tend to have trouble making a decision. So we spent a few weeks eating on our kitchen floor while I was deciding what I wanted... Suuuuper great memory. But not something we wanted to continue for the long-term. I searched long and hard, but I couldn't find anything that I liked (oh, unless I was allowed to spend $2,000 -- which I was not). After our desk tutorial a little while back, I was feeling ready to conquer the world. So, with only a sander and some wood stain, I decided that we were going to give the DIY thing another try. I started (as always) by doing my Pinterest research. After finding a wonderful tutorial on A Beautiful Mess, I was in love. And that was the table we were making. And Mike had to figure out to make it happen. Marriage is the best.

We went to Home Depot and bought six wood planks. We used pine because that is what the guy at Home Depot told us to use. Honestly though, he could have told us anything and we would have believed him. We are very novice DIY-ers.  But it ended up working out pretty well. No complaints so far. Thanks guy at Home Depot!

So after picking out the straightest six boards we could find (I recommend testing them all out right there in the wood aisle smack in the middle of the store), we went and got a few long pieces of wood for the table frame/border and the structural support underneath. We got those few pieces cut to the dimensions that Mike had measured and we were set! We picked up a can of special walnut stain and a can of polyurethane on our way out, and we were on our way.

We used only screws to keep everything together, no glue. After screwing all of the boards and frame pieces together, we sanded for a million years. And then we proceeded to put on literally a million layers of stain and polyurethane. We did all of this in our garage. A little ghetto? Yes. But we were able to get the job done. We ordered the legs from hairpinlegs.com, screwed them in and viola! We had ourselves a table.


http://www.amazon.com/gp/product/B00IKWTLCS/ref=as_li_tl?ie=UTF8&camp=1789&creative=390957&creativeASIN=B00IKWTLCS&linkCode=as2&tag=infiniampers-20&linkId=X2R7LBZRUPC4J62HChairs and rug from Amazon. 

A closeup of the beginnings of our gallery wall. Still a work in progress.


http://www.amazon.com/gp/product/B001003F9M/ref=as_li_tl?ie=UTF8&camp=1789&creative=390957&creativeASIN=B001003F9M&linkCode=as2&tag=infiniampers-20&linkId=TADEY2PL43APBH3N
I am in love with this stain. Minwax Special Walnut.


Pizza Hut Stuffed Crust


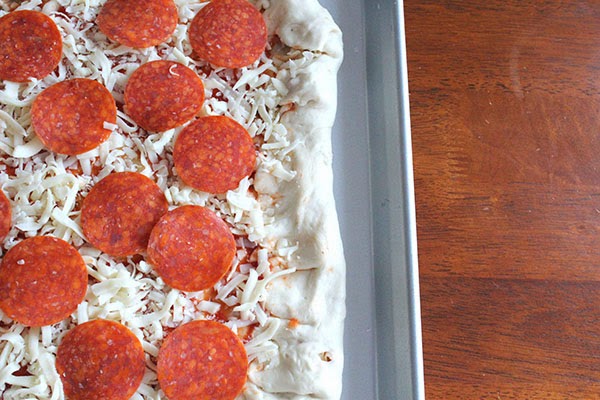
My husband loves pizza. Any kind. Any price. Any level of quality... I, however, am somewhat of a pizza snob. I'll usually only eat pizza from Pizza Hut (stuffed crust canadian bacon and pineapple if we're getting specific). I'm not a brat about it or anything, I just would rather eat cereal or top ramen than any other kind of pizza. Needless to say, my husband doesn't get pizza often. So, when I found this recipe on Pinterest for copycat Pizza Hut Stuffed Crust, I thought I'd give it a try. And it turned out wonderfully! 


Ingredients
1 C. lukewarm water
1 tsp. sugar
2 1/2-3 C. flour
1 tsp. salt
1 Tbs. olive oil

Directions 
Stir together the water, yeast and sugar; set aside for 5 minutes, until it’s foamy.

Add 2 1/2 cups of the flour, salt and oil and stir until the dough comes together

On a floured surface, knead the dough for about 8 minutes, until it’s smooth and elastic. Add more flour if the dough is sticky.

Place the dough in an oiled bowl and turn to coat all over. Cover and set aside in a warm place for half an hour to an hour, until it doubles in size.

Roll the dough out so it's about two inches larger than the pizza pan.

Spread cheese around edge of pan, spoon pizza sauce over cheese. 

Fold over the edges to form ring and press to seal. Prepare remainder of pizza as you like it. 

Bake on a pizza stone (this is the one I have my eye on!) or cookie sheet at 450 degrees for 15-20 minutes, until bubbly and golden.

We absolutely loved how it turned out! (There are no "after" pictures because we devoured it before I had a chance to grab my camera.) The recipe was super easy and surprisingly close to Pizza Hut's version. We've made this pizza a few times already and are still lovin it! Yay for easy compromises in marriage! I'm always super happy when Pinterest recipes actually work out. Let me know if anyone gives this one a try. I definitely recommend it! 

Linking up with Jessica and Ashley today!
http://www.letsgetbananas.com/


DIY Mint Chocolate Chip Desk Tutorial


DIY desk tutorial
One of my goals for 2013 that I made for myself in my head was to do more. By January 5th,  exercise quickly went the way of the dinosaurs, as did cooking. Enter Pinterest. (verb: "Pintering" coined by Mike Davis). So I found a great desk on Pinterest via the talented Jenserafini. It's gorgeous. I loved everything about it. And I thought: "I could do that. A trip to Home Depot and we'll have this done in a Saturday." Possibly the most naive statement I've made in my life.

When all was said and done we tallied four trips to Home Depot, three to four weekends, a couple more Monday family nights, one potential emergency room visit, and around $130. So, if you think this description fits you-- Read on!

Park City
We started our adventure by driving up to Park City to pick up some super cheap bookshelves we found on KSL (Utah's craigslist). Yes the gas made the bookshelves probably not worth the drive, but I got an outlet shopping trip out of it, so we'll call it a draw.

Materials to build your own desk
 Here's the haul from our first Home Depot trip. Here are the basics we used: wood (common board), wood glue, wood filler (not stainable-despite what the packaging says), wood stain, polyurethane finish, primer, paint, and lots and lots of sandpaper!

Building a wood desk
After a few measuring difficulties resulting in repeating our purchase of wood 2.5 times, and hours and hours of drying, we were ready to sand. Shout out to... my entire family for helping out. You guys were great employees. I'm sorry I won't be paying you.

Sanding tips
Look how happy they are! (This is obviously fairly early in the process.)

Next step was to stain the table top. We did three to four coats of Minwax's Dark Walnut stain. A little DIY tip for those of you in winter weather: stain, primer, and paint need to be at a fairly high temperature to work well. So, probably don't attempt this project in the middle of a freezing Utah February. Also, outside working conditions during that time of the year are not ideal. Lesson learned. 

Dark Walnut Wood Stain
Once our table was dark chocolate stained, we started working on the bookshelves. I thought the worst was over, but I was, once again, mistaken. DIY really shouldn't be my thing. Oh well.

DIY at your own risk haha
We sanded, primed, and painted each bookshelf. I chose a muted mint color for the shelves that I may regret in a couple years, but for now I love it!

And this is the portion of the post that I debated about whether or not to include. However, I decided that people might get a smile out of it, so hopefully my struggles were worth it. 
Top: I got primer in my eye. And my husband made me sit under the sink for 10 minutes until he was sure that the paint was out. Don't ask me how I did it. Its just one of those things. 
Bottom: Immediately after getting primer in my eye, I spilled half the can of primer all over the floor. I wish I could say that it was because of impaired vision... but I can't. That was all Brittany.

Overall, we did two coats of primer and two coats of paint. FYI - I got my act together after the 2nd coat of primer.

Upcycling cheap bookshelves
Here are the before and after of our $5 bookshelves. Better, right?

After putting a polyurethane top coat on the desktop, we were done! We let the wood sit for around 72 hours just to make sure that the top coat was set and we weren't going to get fingerprints, dents, etc on the desk. Didn't turn out too bad huh? It is like 1,000% better than I was expecting when we started this little endeavor. The desk is definitely not perfect. When I'm showing it off, I'll probably try to do it in dim lighting (and from a distance). We are clearly beginners. But I'm pretty excited with how it turned out.

Make your own desk with old bookshelves

DIY bookshelf desk
Well I hope you enjoyed our little tutorial. Sorry it isn't a perfect step-by-step, but if you have questions on specifics, I'd love to share our experience! We had a lot of fun making it! I'd love to see pictures/links to your DIY projects. I'm ready to put my husband back to work :)


Buttermilk Ranch Dressing

 We like ranch at our house. Like a lot. A few years ago we discovered the BYU Creamery ranch dressing. I immediately fell in love. It's just a great buttermilk ranch that has that perfect ranch taste. There is one flaw to BYU's ranch offering. It costs a ton. However, I will pay for it.. Every. Single. Time. I will no longer eat our former ranch (Hidden Valley). I would rather go without.

Now that you have some background on our ranch tastes and consumption, I am going to share an awesome recipe that I found on Pinterest via The Crafty Blog Stalker.

easy and delicious buttermilk ranch recipe

BYU Creamery Ranch Dressing Recipe
There are two parts to the recipe: the ranch seasoning mix and the liquid base.

Ranch Seasoning Mix
combine the following:
  1. Black Pepper 1/4 Cup
  2. Parsley Flakes 1 1/2 Cup
  3. Galic Salt 1/2 Cup
  4. Kosher Salt 2 Tablespoons
  5. Granulated Garlic 1/4 Cup
  6. Granulated Onion 3/4 Cup
  7. Dill Weed 2 Tablespoons
I mixed all the above ingredients together and put them in two (shorter) mason jars. This recipe makes quite a bit. The mix should last you for a while, which makes it even easier to make next time! And a great tip from Katie is to get all of these seasonings at WinCo. You can get exactly as much as you need and it's way cheaper than buying full bottles of everything at the grocery store! I think she said she spent $2.50 on all of her spices and I was like "ya right, Katie." But she was absolutely right! I think I came in just under $2.50!

Liquid base:
1 Tablespoon of seasoning mix
1 Cup mayonnaise
1 Cup buttermilk
3/4 Cup Sour Cream
1/2 teaspoon lemon juice

I halved the recipe on the Crafty Blog Stalker blog just because I don't have a place to store a huge container in our tiny fridge. But you can definitely double and probably even triple this recipe for big groups or families. We use this ranch for everything! You can also easily turn this into a tomatillo ranch for Costa Vida/Cafe Rio salads by adding the following:

Tomatillo Ranch Add-ons
1-2 tomatillos
1/4 bunch of fresh cilantro
Little bit of lime juice

Stick it all in the blender for a few seconds, and you're all set! So good!

Anybody going to try this recipe out? Let me know how it goes! I promise you will not regret it.


Related Posts Plugin for WordPress, Blogger...